How do I prepare an SVG to PNG for Canva?
Keep the editable SVG as your source, then export a PNG when Canva needs a fixed-pixel image or when the SVG does not meet Canva's upload constraints. Check the artwork bounds, text, strokes, effects, and transparency before you export. Upload the PNG as a separate handoff asset; do not overwrite the SVG you may need to edit later.
Convert an SVG to PNGChoose SVG or PNG for the job
Canva's current help guidance lists an SVG upload path for vector artwork and a separate PNG path for raster graphics. The choice is about the handoff, not about making the source permanently raster. Use the SVG when you want Canva or another design tool to keep vector geometry. Use a PNG when you need a predictable pixel image, a raster fallback, or a copy whose appearance should not depend on SVG features being interpreted by the receiving editor.
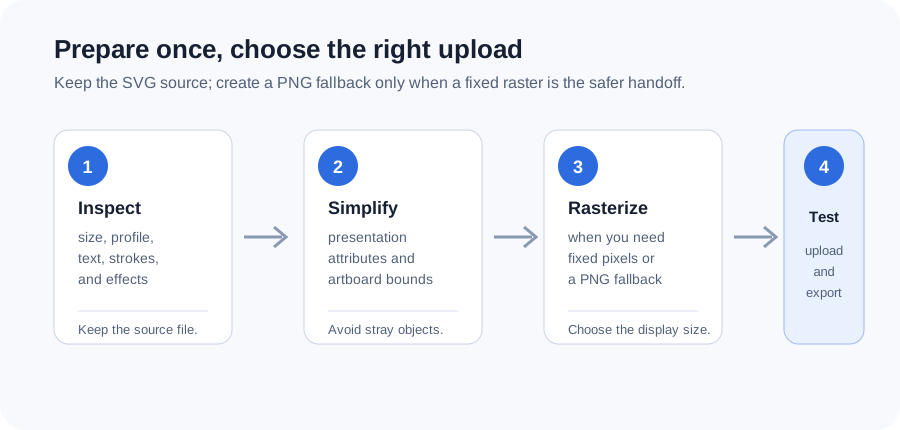
Before using the upload flow, read Canva's current file requirements. Requirements can change, so treat the official help page as the source of truth for the account and editor you are using.
Check the SVG before you export
Canva's published SVG requirements include a file under 3 MB, a width between 150 and 200 pixels for upload, and an SVG 1.1 profile. Its preparation notes also call out expanded strokes, expanded text boxes, grouped same-colour shapes, fitting the artwork to the artboard, and removing stray or invisible objects. Those checks are especially useful even when your final handoff will be a PNG: stray bounds and missing fonts can make the raster result look wrong before it reaches Canva.
- Open the SVG source and confirm the artwork fills the intended artboard. Look for invisible objects that enlarge the bounds.
- Decide whether text must remain editable. If not, convert or expand it in your design tool, then inspect the shapes at the intended output size.
- Check strokes, gradients, textures, masks, and linked images. A feature that looks correct in one renderer can need a PNG fallback for a more predictable handoff.
- Save the cleaned SVG under a new name. Keep the original source unchanged so you can return to it.
Export the PNG with an explicit target
PNG has fixed pixels, so choose the size from the Canva placement rather than from the SVG's file dimensions. If the image will appear in a small card, export a size that keeps the smallest important detail readable there. If it will fill a larger design, make a larger export and test that real placement. A bigger PNG preserves more samples; it does not repair a tiny label, missing font, or clipped artboard.
Export check: intended Canva display width + important detail size + transparent-edge check.
This is a checklist, not a universal pixel formula. Use the converter's custom width or scale controls, preview the result, and replace the example values with the dimensions of your actual design.
For a transparent logo, keep the transparent background only if the Canva design should supply the background. Preview against both a light and dark temporary background so pale edges and accidental matte pixels are visible.
Upload and compare the result
- Upload the cleaned SVG or the exported PNG into a test Canva design, depending on the handoff you selected.
- Place it at the intended size and inspect the edges, text, alignment, transparent corners, and any effects that were important in the source.
- Compare the test result with the original SVG at the same visual size. Do not judge a PNG only by opening it zoomed far beyond its intended placement.
- Download a small test PNG from Canva only after the in-editor result is correct. Keep your own source SVG and exported PNG together with clear filenames.
If the SVG upload is rejected or renders unexpectedly, check the official requirements first. If the fixed PNG is accepted but looks soft, export a larger PNG from the original SVG instead of enlarging the already-rasterized file.
Simple handoff naming
Use clear names such as logo-source.svg, logo-canva-600px.png, and logo-canva-transparent-600px.png. Include the intended width or use in the filename. That small bit of context prevents a teammate from placing a low-resolution fallback into a large design by accident.
FAQ
Do I always need to convert an SVG to PNG for Canva?
No. Start with the SVG when keeping vector editability is important and the file meets Canva's current SVG requirements. Use PNG when a fixed raster handoff is the better fit.
Why does my Canva upload look cropped?
Inspect the SVG artboard and viewBox, then look for stray or invisible objects. Export a PNG after the visible artwork is fitted to the intended bounds and compare it in the real Canva placement.
Does a larger PNG fix missing text?
No. A larger raster export cannot recreate a font or text that was missing during rendering. Fix the source text or font first, then export again.