How do I put an SVG diagram into a README as a PNG?
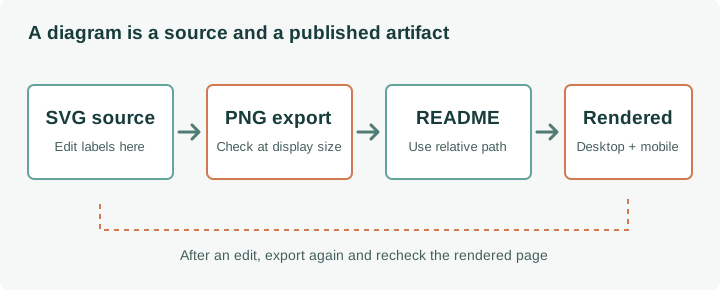
Keep the editable SVG, export a PNG at a width that makes its smallest label readable, and link to the PNG with a path relative to the README. Open the rendered README, not just the image file, to check the actual size, contrast, and alt text. After any diagram edit, export again so the source and PNG describe the same thing.
Convert your SVG diagramOne source, one export, one reference
Here is a small example workflow. The diagram below is original and illustrative; its folders are not a required repository convention. A README at the repository root can refer to an image in an images folder using images/overview.png. If the README lives elsewhere, adjust the path from that file's location.
project/
README.md
images/
overview.svg
overview.png
The alt sentence should describe what this particular diagram conveys. Replace the sample words with its real subject; do not use a file name as the only alternative text.
Choose pixels for the rendered size
First decide how wide the diagram will appear in the README. For an illustrative target width of 640 display pixels, a 1280-pixel export is twice as wide. That can leave extra pixels for a high-density display, but it does not make tiny source labels readable. The numbers here are a design example, not a universal platform requirement: export width = displayed width × scale factor, or 640 × 2 = 1280 in this example.
- Remove unnecessary detail and increase small labels in the SVG. Read them at the intended displayed width before converting.
- Open the SVG in the converter, choose a custom width or scale, inspect the preview, and download one PNG. Use an opaque background if transparent lines disappear against different page themes.
- Inspect the PNG at both its actual pixel size and the width used in the README. A sharp zoomed image can still fail when embedded small.
- Place the PNG in the repository and update the Markdown path. Keep the SVG source beside it so a later revision is editable.
If you need to constrain display width, check what your Markdown renderer permits. A plain Markdown image is the portable starting point; some renderers also accept an HTML image element with a width attribute. Do not assume every README host will render that HTML identically.
Check the rendered README
| Symptom | Check |
|---|---|
| Broken image | Check capitalization, extension, and the path relative to the README, including the image in the committed files. |
| Unreadable labels | Inspect at the README's displayed width. Simplify the SVG or enlarge labels; exporting more pixels alone will not change their proportions. |
| Invisible lines | Inspect light and dark reading surfaces. Strengthen contrast or choose an intentional background before export. |
| Old diagram still shown | Compare the SVG and PNG file contents and make a fresh export after source changes. Confirm the README links to the revised path. |
Test the README's rendered view on a narrow screen as well as desktop. If its text must be zoomed or panned just to follow the flow, split the diagram into smaller steps and provide a short explanation in text beneath it.
FAQ
Should I delete the SVG after converting it?
No. Keep the editable source if you control it. The PNG is an output for the README, not a substitute for the source.
Will a larger PNG fix tiny text?
Not by itself. Its labels remain proportionally small when the entire image is reduced to the same display width. Edit the diagram first.
Does this converter upload my diagram?
The conversion runs locally in your browser. Committing the resulting PNG to a public repository is a separate publication step that you control.